A worker reaches into a jammed conveyor belt without verifying the power source is secured. Seconds later, a startup cycle activates the machinery—resulting in catastrophic injury. This isn’t hypothetical. It’s a preventable reality that happens when lockout tagout procedures fail. At the heart of effective LOTO programs lies a simple yet powerful tool: the visual example—a picture of lockout tagout on equipment. These images aren’t just illustrations—they’re critical training aids, compliance references, and real-time reminders of how to protect life and limb.
A clear, accurate picture of lockout tagout on equipment shows more than just a lock on a switch. It demonstrates context, correct application, and procedural discipline. Whether posted on a shop floor, embedded in training modules, or referenced during maintenance, these visuals bridge the gap between policy and practice.
Why a Picture of Lockout Tagout on Equipment Matters
In high-risk industrial environments, written procedures alone aren’t enough. Human memory fails. Language barriers exist. Stress and urgency can override judgment. A well-documented image cuts through these challenges. It provides immediate clarity.
Consider a maintenance technician called to service a hydraulic press. The written LOTO procedure lists six steps. But a single image—showing the main disconnect locked, the tag in place, and isolation points clearly marked—can confirm the correct execution in seconds.
Real-world impact of visual LOTO documentation: - Reduces misinterpretation of lock points - Speeds up verification during audits - Enhances onboarding for new staff - Supports multilingual teams - Reinforces accountability through visible proof
When a picture of lockout tagout on equipment is standardized across a facility, it becomes part of the safety culture. It turns abstract rules into tangible actions.
Key Elements in an Effective LOTO Image
Not all pictures are equally effective. A useful image must be specific, accurate, and actionable. Here’s what to include:
- Clear Isolation Point
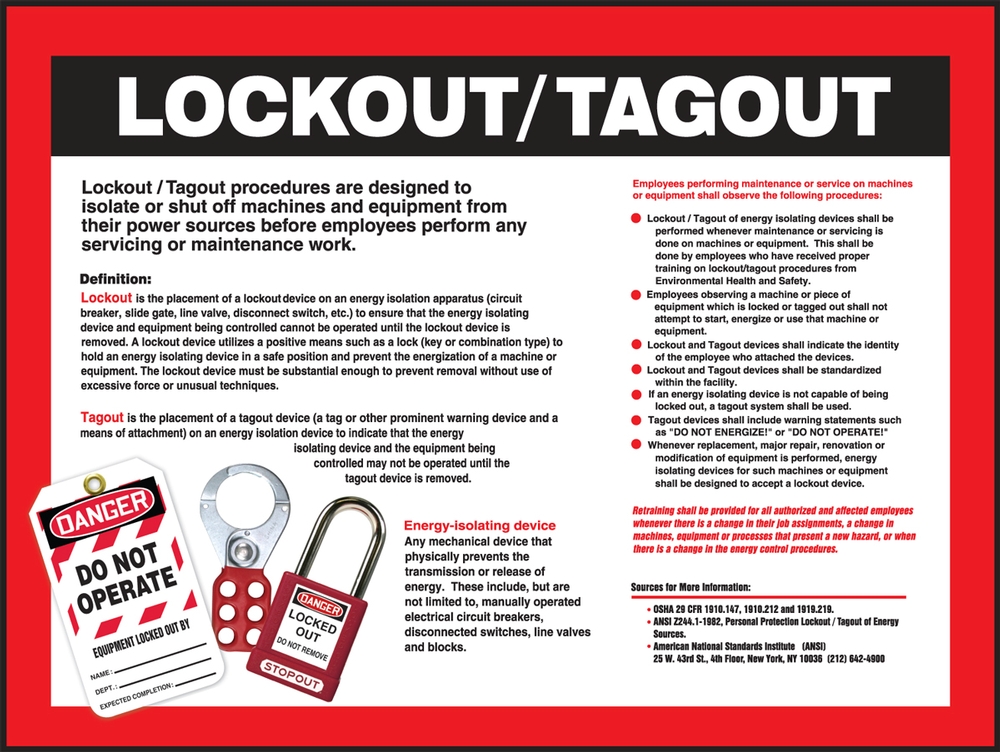
- The photo must show the exact energy-isolating device—be it a circuit breaker, valve handle, or disconnect switch—secured with a lock.
- Visible Lock and Tag
- The lock should be industrial-grade, uniquely assigned. The tag must display the worker’s name, department, time of lockout, and reason.
- Energy Sources Identified
- Multiple energy types (electrical, pneumatic, hydraulic, thermal) may need isolation. The image should reflect all applicable sources.
- Proper PPE and Tools
- A technician in the image should wear appropriate personal protective equipment (PPE), reinforcing full compliance.
- Contextual Environment
- Background details—machine type, location, surrounding hazards—help viewers apply the image to real situations.
A poorly taken photo—blurry, missing tags, or angled to hide critical components—can do more harm than good. It may imply that partial compliance is acceptable.
Common Mistakes Seen in LOTO Visuals
Even experienced safety managers fall into traps when creating or selecting lockout tagout images. These are the most frequent errors:
- Using Generic Stock Photos
- A lock on a random valve tells workers nothing about their equipment. Custom visuals tailored to specific machinery are essential.

- Omitting the Tag Details
- If the tag isn’t legible, the image fails to teach proper documentation. Names, dates, and reasons must be visible.
- Showing Multiple Locks Without Explanation
- Group lockout scenarios require a clear procedure. A photo with five locks and no context can confuse rather than clarify.
- Including Bypassed Safety Guards
- Images should never depict safety violations—even if staged. It normalizes poor behavior.
- Poor Lighting or Angles
- If the viewer can’t see the lock mechanism or tag, the image has no value.
A maintenance supervisor at a Midwestern manufacturing plant once used a stock image of a red lock on a breaker panel during training. Months later, an incident occurred because a technician assumed any red lock was sufficient—ignoring the requirement for employee-specific locks. The lesson? Visuals must be precise, not just symbolic.
When and Where to Use LOTO Images
A picture of lockout tagout on equipment isn’t just for training binders. It should be integrated into daily operations:
- At Machine Stations
- Mount laminated photos near high-risk equipment showing the correct lockout points. Use arrows or overlays to highlight critical areas.
- In Digital Work Instructions
- Maintenance software and CMMS platforms should include step-by-step images for each servicing task.
- During Safety Audits
- Compare actual lockout setups to reference images to verify compliance.
- In Incident Reviews
- Show side-by-side comparisons of correct vs. incorrect setups to reinforce learning after near-misses.
- In Onboarding Modules
- New hires absorb procedures faster when paired with visual examples.
One paper mill reduced LOTO violations by 68% within six months of installing equipment-specific LOTO visuals at each major machine. Workers reported feeling more confident identifying isolation points—especially in high-noise, time-pressured environments.
How to Create Your Own Effective LOTO Photos
Creating useful lockout tagout visuals doesn’t require a professional photographer—just attention to detail.
- Step-by-step guide:
- Identify Critical Equipment
- Prioritize machines with multiple energy sources or high incident history.
- Perform a Real Lockout
- Conduct the procedure exactly as required—same PPE, same tools, same sequence.
- Stage the Shot
- Use a clean, well-lit environment. Position the camera to show the lock, tag, and isolation device clearly.
- Add Annotations (Optional)
- Use arrows or numbered labels to guide the viewer’s eye—especially for complex systems.
- Review with Safety Team
- Ensure the image aligns with written procedures and OSHA standards.
- Update Annually or After Changes
- If a machine is upgraded or reconfigured, the image must be replaced.
Avoid using mannequins or staged actors. Real technicians, real locks, real settings build credibility and trust.
Top 5 Uses of LOTO Images in Modern Facilities
| Use Case | Benefit | Example |
|---|---|---|
| Training Modules | Accelerates learning curve for new hires | A 10-minute video showing LOTO steps with still images of correct application |
| Audit Checklists | Provides benchmark for compliance | Safety officer compares live setup to posted image during monthly inspection |
| Multilingual Support | Overcomes language barriers | Spanish and Vietnamese-speaking crews reference the same visual standard |
| Remote Troubleshooting | Allows off-site engineers to confirm safety | Technician sends photo of lockout setup for approval before beginning work |
| Incident Prevention | Reinforces consequences of non-compliance | Side-by-side images of proper vs. improper lockout shown in safety meetings |
These applications turn static images into dynamic tools for continuous safety improvement.

LOTO Image Compliance and OSHA Expectations
OSHA’s standard 29 CFR 1910.147 doesn’t explicitly require photos, but it mandates that energy control procedures be “retained and made available for inspection.” Visual documentation satisfies this—and goes further.
During inspections, OSHA compliance officers often ask: - Are procedures clear and accessible? - Can employees demonstrate proper lockout? - Is there evidence of training and enforcement?
A picture of lockout tagout on equipment serves as proof of all three. It demonstrates that the employer has gone beyond minimal compliance to create a visual safety language understood by all.
One refinery was cited not for missing procedures—but for having written-only instructions that workers consistently failed to follow. After implementing visual LOTO standards, their next audit resulted in zero findings.
The Hidden Risk of Outdated or Inaccurate LOTO Photos
An outdated image is worse than no image. If a machine’s disconnect switch is relocated but the photo still shows the old position, workers may lock the wrong point—believing they’re compliant.
Common triggers for image updates: - Equipment modification or replacement - Process changes involving new energy sources - Relocation of control panels or isolation points - Introduction of new lock types or tagging systems
Build a review cycle into your safety program. Assign ownership—like a LOTO coordinator—to audit visuals quarterly.
Final Thoughts: Make the Picture the Standard
A picture of lockout tagout on equipment is more than a safety poster. It’s a frontline defense against human error. It transforms abstract rules into visible, repeatable actions. In environments where a single missed step can cost a life, clarity is non-negotiable.
Stop relying on memory. Stop accepting vague illustrations. Take real photos of real lockouts on your real equipment. Post them. Train with them. Audit against them.
Safety isn’t just a policy—it’s a practice. And the best practices are the ones you can see.
Take action today: Pick one high-risk machine in your facility. Perform a full lockout. Take a clear, detailed photo. Share it with your team. Make it the standard. Repeat for every critical asset.
FAQ
How do I take a good picture of lockout tagout on equipment? Use clear lighting, focus on the lock and tag, ensure all isolation points are visible, and include context like machine type and PPE.
Can I use stock images for LOTO training? Avoid generic stock photos. Use images specific to your equipment and procedures for accuracy and relevance.
What should a LOTO tag show in the picture? The worker’s name, department, time of lockout, reason for lockout, and contact information.
Are digital LOTO images acceptable for compliance? Yes, if they’re accessible, up-to-date, and part of documented procedures.
How often should LOTO photos be updated? Annually, or immediately after equipment changes, relocations, or process modifications.
Do LOTO images replace written procedures? No. They supplement written procedures by providing visual clarity and reinforcement.
Can multiple locks be shown in one LOTO image? Yes, but only if the image includes an explanation of group lockout protocols and the role of each lock.
FAQ
What should you look for in Understanding Lockout Tagout Equipment Visuals for Safety? Focus on relevance, practical value, and how well the solution matches real user intent.
Is Understanding Lockout Tagout Equipment Visuals for Safety suitable for beginners? That depends on the workflow, but a clear step-by-step approach usually makes it easier to start.
How do you compare options around Understanding Lockout Tagout Equipment Visuals for Safety? Compare features, trust signals, limitations, pricing, and ease of implementation.
What mistakes should you avoid? Avoid generic choices, weak validation, and decisions based only on marketing claims.
What is the next best step? Shortlist the most relevant options, validate them quickly, and refine from real-world results.